Pages

Sunday, March 4, 2012

Ways to Feel Warm on Dreary February Evenings

After about the third iteration of snow-->rain-->melt-->freeze (a common occurrence here in Montreal at this time of year), I decided a night of good friends and food from warm, dry places was needed. So I hosted a vaguely-Moroccan themed dinner party.


The menu consisted of 3 main items:

  • Zalouk, which I assembled 5 minutes before the guests arrived and which was gone shortly thereafter, i.e., before any pics could be taken. All I'll say is this: take the time to roast the eggplant. It's dead easy and makes a world of difference.

  • Chicken Tagine (it's always a good sign when you can follow your own recipe).

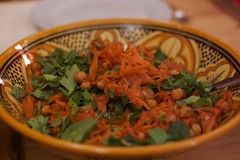
  • And a carrot and chickpea salad, which was a hybrid of two recipes: Chachi's carrot and chickpea salad , and Pan Chancho Bakery's Moroccan chickpea salad.


Between the chick pea salad and the chicken tagine, there are a lot of similarities. Similar to Indian food, there are a few core spices/flavors that most Moroccan dishes share, and once you have that, you can get pretty creative.

Ingredients:


  • 3 cups grated carrots
  • 1 15oz. can chickpeas, drained and rinsed.
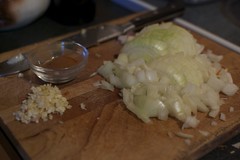
  • 2 onions (about 1 3/4 cup, chopped)
  • 1/3 cup extra-virgin olive oil
  • 1/2 tsp salt
  • 2 tsp paprika
  • 1/4 tsp chili pepper flakes
  • 1 tsp cumin
  • 3/4 tsp cinnamon
  • 3 cloves garlic (about 1 1/2 Tbsp)
  • 1/2 cup tomato paste
  • 2 Tbsp of chopped mint/parsley/cilantro
  1. First, grate the carrots and drain and rinse the chickpeas, set aside.
  2. Next, chop onions, garlic, and assemble spices.
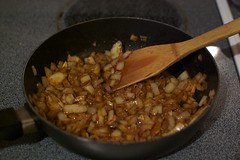
  3. In a medium skillet, heat the olive oil over medium heat and add the onions--cook until tender.
  4. Add garlic and cook for another 2 minutes.
  5. Add tomato paste and mix in well and cook for another 5 minutes.
  6. In a large bowl, toss tomato mixture with the chickpeas and mint/parsley. Taste and add some salt if needed.


Sunday, February 5, 2012

"Women, Cats and Marmalade...


Marmalade moodiness, originally uploaded by CaitKP.

will do as they please, and men, dogs and marmalade makers should relax and get used to the idea." To paraphrase a quote from Robert Heinlein.

The photo above shows marmalade made from the same recipe (Nige's), in different years (left: this years batch, right: 2 years ago's batch).

How one of them ended up several shades lighter but with a firmer set than the other is anybody's guess. All I know is that they both taste delicious..totally different, but delicious none the less.

Marmalade...always an adventure.

Monday, January 23, 2012

Mushroom Vindaloo

Mushroom Vindaloo
(originally taken from here)

Ingredients:
1-2 pack of button mushrooms (about 3 cups, sliced if big and whole if small)
1 small onion, chopped
1" ginger chopped
3 cloves garlic
1 15 oz can crushed tomatoes
1 Tbsp cumin powder
1 Tbsp ground coriander
1 tsp turmeric
1 tsp garam masala
2 dried red chilies, with seeds (crumbled)
2 chopped serrano chilies (seeds or not, depending on how brave you are)
1 tbsp white vinegar
1/2 cup yogurt
2 tbsps chopped cilantro leaves
2 tbsps olive oil
Salt to taste

Directions:
1. Grind onions, garlic, serrano chilies, and ginger into a fine paste (I use a mini food-processor, but a mortar and pestle should work too).
3. Heat oil in a pan; add the onion, garlic, ginger and chili paste and saute on medium heat until the raw smell of the onion is gone and the mixture has turned slightly golden (about 5 min.).
4. Now add the crushed tomatoes, turmeric, red chilies, garam masala powder, cumin powder,ground coriander and saute well for about 3-4 minutes until well blended and the spices are fragrant.
5. Add the yogurt, salt and mushrooms and simmer for about 20-30 minutes or until the mushrooms are cooked to the desired consistency.
6. Add white vinegar and simmer for few more minutes.
7. Garnish with coriander leaves and serve.

Sunday, January 22, 2012

Chicken Tagine with Chickpeas and Apricots

Edit: I made it again, and now there are photos!


I made this a couple weeks ago, but wanted to get a photo before I published the post...however, it "got et" before any such photo could be taken...so you'll just have to make it and see for yourself.


2 Tbsp olive oil
4 skinless chicken thighs
1 large onion, chopped
1″ piece of fresh ginger, chopped
3 cloves garlic, finely chopped
1.5 tsp ground coriander
1 Tbsp ground cumin
1.5 tsp ground cinnamon
.5 tsp cayenne pepper, or to taste
1 Tbsp harissa paste
1 preserved lemon (pith and seeds removed, chopped)
3/4 c dried apricots
1 red or yellow bell pepper, sliced
1 15-oz can chopped tomatoes.
1 15-oz can chickpeas, rinsed and drained
1-2 c chicken stock, or water
1/2 c bulgur (or couscous)
salt & pepper, to taste
1/2 c fresh parsley, chopped

In a large pot, heat oil over medium-high heat. When hot, add chicken and cook until brown on all sides. Remove from pot and set aside.

Reduce the heat of the pot to medium and add the onions. Cook until onions become soft, about 5-7 minutes. Add bell pepper and cook for 3-5 minutes. Add garlic, ginger, coriander, cumin, cinnamon, cayenne, apricots, harissa, lemon, and tomatoes. Cook for another 5 minutes, stirring frequently.

Add chickpeas to the pot, along with a cup of chicken stock or water. When the mixture reaches a gentle boil, bring the chicken back to the pan. Cover and simmer for about 15 minutes, or until the tomatoes begin to break apart. Stir in bulgur or couscous. If necessary, add more stock or water (no more than a cup) to the pan. Add salt and pepper.

Cover and simmer until the bulgur is done and the chicken is nearly falling off the bone, about 10-15 minutes. Cooking time will be less if you substitute with couscous. In the last minute of cooking, stir in freshly chopped parsley. Season to taste and serve.

Serves 3-4

Sunday, January 8, 2012

Chaat: In three easy steps


Chaat is the prototypical Indian snack/street food. It has everything you could ask for in a snack: flavour, substance, and arguably the most important, crunch.

Step 1: Find the crunchies. What are crunchies, you ask? They usually consist of a mixture of sev (small crunchy fried noodles), lentils, and puffed grains. They come in bags like the ones in the picture above. We found them by sheer luck at the local fruit shop. If you have a nearby Indian or Asian market though that would probably be a good place to start looking. In a pinch, you could substitute any sort of crunchy noodle or unsweetened cereal, seasoned with some turmeric and chile powder.

Step 2: The content. This step is open to interpretation. Basically, you need something to put the crunchies on. I prefer to roast a starchy veg of some sort (potato, squash, chick peas) tossed in olive oil and curry paste (I use Patak's Jalfrezi paste), but you could also boil potatoes and season them after the fact, or in a pinch, you could even get away with tossing a (rinsed and drained) can of chick peas with oil and spices (cumin, corriander, curry powder, chile).

Step 3: Assemble. Let the veg come to room temperature (if it's not there already) and mix with fresh cilantro, lime juice, and yogurt. Top with a bit more yogurt, tamarind sauce and crunchies.

Here's an example to give you an idea of numbers (this serves 2 as a meal and 3-4 as a side/snack):

The Veg:

1 small - med butternut squash, peeled and chopped into 1" cubes
1 can chickpeas, rinsed and drains
3-4 tbsp curry paste
3-4 tbsp olive oil

In a roasting tin, mix all four ingredients together. Roast at 375 for an hour, or until the squash is soft and has a bit of color.

The Chaat:

1 recipe veg at room temp
1/2 - 2/3 cup + 2 tbsp plain yogurt (or more if you prefer)
large handful cilantro
juice of 1/2 a lime
1/2 cup crunchies
tamarind sauce

Put the veg in a bowl and mix with 1/2 cup yogurt, cilantro and lime juice. Top with crunchies, remaining yogurt, and tamarind sauce.

This is an excellent way to use up leftover potatoes and the like.

Saturday, December 31, 2011

2011 in Jars

2011 was not, in retrospect, a particularly stellar year for me in the cooking department. Maybe the abundance of fast/affordable/awesome food options available in Montreal at all hours were to blame... or maybe it was the seemingly constant change of culinary surroundings (we moved 3 times in 10 months). At any rate, most of my cooking was of the old-standby nature (and very little of it was blog worthy).

The one exception to this was the canning. This year, knowing that the dark dismal winter would eventually descend upon us (and indeed it has), I decided to do everything I could to save a bit of summer/fall for those dismal months that follow the holidays.

So, without further ado, I give you the year in jars:

February:

Kiwi-Lemon Marmalade: You've already heard about this one in gory detail. Suffice to say that it has brightened many a dull morning and will hopefully continue to do so until next February when I will try to get the wheels on the wagon a bit sooner and make a batch of proper Seville orange marmalade.


July:

Pesto v1: In Montreal at least, this is the time of the year when you can buy giant bouquets of basil at the market for less than the cost of a single ziplocked packet of 6 leaves at the grocery store. They are impossible to pass up, along with the baskets and baskets of gorgeous ripe tomatoes. While it is tempting to eat them as they are, raw and fresh with nothing but a dash of salt and olive oil, I managed to resist long enough to make a couple batches of pesto, frozen in icecube trays to brighten the pastas of days to come.

Pesto v2.0: The CSA gave us garlic scapes. More garlic scapes than you could shake a stick at, so, I threw them in the blender with some oil, salt, and pepper, and froze the result in jars, to be used at a time when anything naturally green would be a welcome addition to the meal.

September:

Plum Jam: The market is overwhelming at this time of year. There are giant bins of plums, grown locally, being sold by the pound and I cannot say no. This is a minimal effort jam. No straining, no pectin, nothing fancy. The result is a simple spread that is perhaps a touch runny but makes up for it with its purple hue and summery flavour. Next year, it's peaches and nectarines.

Tomato Sauce: Like the basil, the tomato sauce project was inspired by seeing the bushels of tomatoes at the market, and knowing that in 3 months time, they would be gone and the pink tennis balls would return. Tomato sauce making is quite an endeavour. It probably warrants a post of its own. If you're considering it though, I recommend procuring a copy of "Les Tomates en Conserve" a how-to dvd put together by some Montrealers who've been at this for a while.

October:

Tomato Chutney: All the flavours of fall: apples, peppers, raisins, onions, and tomatoes, captured in a jar to adorn many a cheddar slice and tortiere in the months to come. (Be warned, this recipe makes well over a dozen 1/2 pint jars).

November:

Quince Jam: Quinces (or coings en francais) were featured in the fall issue of Edible Toronto. Although they are mostly grown in Europe, the climate in southern Ontario is well suited for them. Alas, I was unable to find local quinces (mine came from California), and my jam didn't turn ruby red as described in the article. It did however, have a lovely floral note to it, good for topping both toast and pork tenderloins.

(Chutney, plum jam, quince jam, lemon marmalade)

December:

Meyer Lemon Marmalade: The arrival of new citrus options is cold comfort for the disappearance of the tomatoes and other fall harvests, but it is hard to ignore the golden yellow glow of Meyer lemons in the grocery store. On a whim, I buy two bags, and begin researching what to do with them. The preferred method for dealing with them in this quantity is of course, marmalade. Meyer lemon marmalade is a one day operation: their skins are so thin and tender that they do not need to be soaked, peeled, or preprocessed in anyway, and the pips and pith, thin as it is, usually contain enough pectin to set the whole batch. This batch was no exception.

Thursday, April 14, 2011

Montreal Needs a Chipotle (and other observations)

Congratulations Seattle. You have one thing Montreal doesn't: a Chipotle (in fact you have several). Here in Montreal, our Mexican options are limited at best, and besides, Chipotle is more SF than Mexico. To be honest, I was recently asked what made a mission-style burrito so different from a normal one, and I'm embarrassed to say I couldn't come up with a good answer. The more I think about it, I think the secret lies in better cuts of meat, more interesting flavors (tomatillas over tomatoes, limes over chili powder), and fresh toppings).

Anyways, it appears that the limiting factor for proper mission-style burritos in Montreal is not the pork (in fact Chipotle gets theirs from Quebec (!)) but the rare and exotic giant burrito tortilla. So when I happened upon them at Taco Del Rey in the Jean Talon market, I knew exactly what my next culinary project would be.

Pork Carnitas Burrito


The basic premise behind pork carnitas is to cook a pork shoulder long and slow in spices and liquid, until the meat is tender, shred the meat, and use a bit of the cooking liquid (boiled down) as a sauce. I used this recipe for salsa verde carnitas , however, I must admit that I cheated on the salsa verde and bought a large container from Taco Del Rey, instead of making it from scratch.


Pork Carnitas Burrito
Pork Carnitas, originally uploaded by CaitKP.


(Serves 8+…I've eaten 3 burritos this week)

Ingredients:
1-2kg pounds pork shoulder (I used 2kg on the bone)
1 onion (chopped)
2 cups salsa verde (here's Kevin's recipe, if you feel like going all out)
2 cups chicken stock (a little more if needed to cover the pork)
1 tablespoon cumin
1 teaspoon oregano

Directions:
1. Trim the excess fat from the pork.
2. Place the pork, onion, salsa verde, chicken stock, cumin and oregano in a pot.
3. Bring to a boil, reduce the heat and simmer until the pork is nice and tender, about 3-6 hours (I did 3 hours, but a little more wouldn't have hurt)
4. Take the pork out of the liquid and shred the meat with a pair of forks.
5. Bake the shredded pork in a preheated 400F oven until just browned and slightly crispy.
6. Skim the fat from the liquid.
7. Bring the liquid to a boil, reduce the heat and simmer to reduce for about 10 minutes.
8. Mix some of the liquid back into the pork (I added a couple cups worth).
9. Use the pork mixture in your favorite tacos, burritos, enchiladas, etc.

Which brings us to part 2 (the other secret of the mission-style burrito): Toppings! Obviously, the meat is just the beginning. Here are some of my favorite additions:

1, Rice, is a must obviously, to make it a bit more exciting, I used a mixture of brown and wild rice, seasoned with onion, garlic, cilantro and lime (here's one recipe and here's another)

2. Beans, you can go refried, or used canned whole black beans (drained and rinsed, of course).

3. Guacamole or avocados

4. Cilantro, lettuce, tomatoes.

5. Cheese (I used pepper jack, but anything mild will work)

6. Salsa. I am partial to salsa verde myself, but others I know swear by salsa rosa, pico de gallo, or corn salsa. It's your choice.

LinkWithin

Related Posts with Thumbnails